
I’m sure that every time you go to buy a new bicycle, the same doubt creeps in about which size to choose. And it’s even worse when you know you’re at an in-between point where two sizes could both work. What size of bicycle do I need?
Cycling is a demanding sport, if only because of the position you have to hold for hours on end. So getting the measurements right, and choosing the correct size, is fundamental.
Deciding whether a given size, brand or model will suit you can become quite an overwhelming process.
I’ll walk through the complexities of bicycle geometry and give you some tips so you can choose your size with much more confidence.
A bicycle frame is fairly simple: it’s made up of a series of tubes, between nine and eleven of them. These form a trapezium at the front and a triangle at the rear. By varying the lengths of the tubes, especially those of the front trapezium, what we get is a wide range of bicycle sizes (frame size), which then match the anthropometric measurements of riders.
At the same time, the angles can also vary. The angles of the bicycle alter its geometry, but where we feel their effect most is in handling and steering. Thanks to all these combinations, today there are many types and sizes of bicycles.
When we talk about custom framebuilders, it becomes even more complex. Thanks to custom framebuilding, you can achieve a perfect fit on a mountain bike, a road bike, a gravel bike or any other type.
As I said in the opening lines, cycling requires you to hold a demanding and possibly unnatural position for a long time. So a perfect geometry fit can make a real difference to performance and comfort.
In decades past, when framebuilding was based on steel, it was fairly common for road riders to have a custom-built frame. They weren’t put through bike fittings as precise as today’s. A few very simple measurements were taken with rudimentary techniques that were precise enough for the time to achieve the right size and an excellent fit on the bicycle.
After the arrival of mass-produced bicycles, these practices gradually disappeared. A mass-produced bicycle was cheaper than a custom bicycle built in a small workshop.
If you remember, bicycles before the 90s had a top tube completely parallel to the ground. That made some of them quite tricky to get on. A few years later, in the late 90s, the makers came up with a major innovation that allowed them to offer most riders sizes suited to their dimensions. Thanks to compact frames and sloping, the rider only needed to change the stem or the seatpost to fine-tune the bicycle to a perfect fit.

These days, makers have agreed on sizes and nomenclature to label frame sizes, and riders now have a much shorter list of frame sizes available than in previous decades.
We also need to consider the different cycling disciplines. The difficulties of choosing the right size are most apparent in road cycling, where you’ll find racing bikes, endurance bikes, cyclocross, gravel, randonneur, etc.
This standardised non-standardisation means the rider needs to study every detail of the geometry carefully, or be advised by an expert on which bicycle and size best suit their body proportions. This is where the decision by many riders to buy a custom steel bicycle comes from. Being able to choose every detail, every measurement and even the ride characteristics of the bicycle is something unique that will make your performance and comfort on the bike as good as they can be.
Even so, deciding which size of bicycle you need is still complicated. And at this point you’ll be wondering:
Where do I start?
A person on a bicycle has three contact points: the handlebars, the saddle and the pedals. The triangle these form is called the Cockpit.

They say a picture is worth a thousand words — clear enough, right? Naturally, depending on the cycling discipline and the type of bicycle, this position varies.
The first stage in properly determining the size of a bicycle is to determine the rider’s ideal position at each of those three contact points, and this will be determined by body measurements, strength and flexibility. In short, it will be based on their biomechanics. That’s why it’s important to have a bike fitting done before buying either an off-the-shelf bicycle or a custom bicycle, especially the latter. The fitting ensures the frame is matched to the rider with full precision.
In the past, fitting a bicycle was based on the opinion and traditional ideas of mechanics, craftsmen or riders themselves. Today it has become quite a sophisticated science, using complex tools alongside computers. This gives the rider the exact measurements they need in the cockpit and, by extension, in the size of the bicycle.
Once a rider finds their ideal position on the bike and feels it’s effective, that becomes the template for future bikes. To reach that position, you’ll usually need a bike fitting, though there are riders who, through experience and years of trial and error, already have their measurements perfectly dialled in.
How do I take measurements from my bicycle?
The common measurements usually taken to determine the size of a bicycle are saddle height and the distance from the centre of the saddle to the centre of the handlebars, though these aren’t precise. For greater precision, the measurements to take are those made from the bottom bracket.

These measurements are taken from the centre of the seat tube, from the centre of the handlebars and their relation to the bottom bracket. They are measurements that won’t vary depending on the components used, with the exception of the stem. On a custom-built frame, not even the stem will change those measurements, because the stem is a fundamental part of the frame geometry, and the bicycle will be built with a specific stem in mind, with everything tailored to the rider’s biomechanics.
However, if we took the tip of the saddle as our reference, or the drop of the handlebars, or the backsweep in the case of mountain bike handlebars, the measurements would vary as soon as we used different handlebars or saddles.
To take these measurements you need a tape measure and a spirit level. Although we won’t achieve millimetric precision — since these are “rudimentary tools” and not specialised ones — we’ll get near-perfect reference points for the bicycle’s measurements.
One of my personal sayings goes: “one millimetre on a bicycle is a lot, but five is absurd”. And although some riders are more sensitive than others to small changes, this way of taking measurements should be enough, and work pretty well for those who are less sensitive.
You may well be one of those people who, when reading or hearing someone talk about being sensitive to 1 mm changes, thinks of the tale of “The Princess and the Pea”. There are people who drink a €1 wine and find it tastes the same as a €300 one, and the other way round. Or someone who listens to music and thinks it sounds the same on free headphones from the train as on a €250 pair with the latest technology. It’s the same with the bicycle: every rider is different.

Reading the cockpit from the geometry
Once we have the measurements of the three contact points, it’s time to design the frame geometry. The big brands don’t take all these details into account, since they create bicycle sizes with standard measurements. But when we’re talking about a custom bicycle, it’s necessary to go into many details to make the rider feel comfortable.
Having these measurements gives us great freedom, and we can modify the frame’s characteristics without affecting the position on the bicycle or its comfort. This way, we always take into account the rider’s preferences and the changes in the bicycle’s behaviour with different measurements.
Once we’ve defined the bicycle size, we can fine-tune the rider’s contact points to create a more precise position. The key to achieving all this is simply to compare, understand and spend plenty of time with BikeCAD.

Thanks to programs like BikeCAD, we custom framebuilders can do work that’s far more detailed and personalised. Quite the opposite of what happens on assembly lines, where the same geometry or bicycle size will serve hundreds of thousands of customers.
How to analyse a bicycle’s geometry
A bicycle’s geometry consists of a wide variety of measurements and angles. Most of the latter are taken using the ground as a reference. Every bicycle brand provides, in its catalogues, charts with an overwhelming amount of information and data about the geometry of each model and bicycle size.

But if you remember what I was saying at the start:
A bicycle frame is fairly simple: it’s made up of a series of tubes, between 9 and 11. These form a trapezium at the front and a triangle at the rear. By varying the lengths of the tubes, especially those of the front trapezium, what we get is a wide variety of sizes and rider proportions.
Starting from this idea, we can break the frame down into smaller pieces to make all those numbers easier to digest.
The main front trapezium is made up of the top tube (Top Tube), seat tube (Seat Tube), down tube (Down Tube) and head tube (Head Tube). Based on the measurements of these tubes, and the angles of the Seat Tube and the Head Tube, we’ll fine-tune the cockpit measurements. But the most important thing is the need to carry out a meticulous study of the measurements of those tubes to achieve a perfect fit for the Stack and the Reach.
These days, these two measurements are essential for creating a good cockpit where the rider feels comfortable.
At this point, the bottom bracket (Bottom Bracket) can also be considered important. Although if we make a good adjustment of Stack and Reach, the measurements that determine the Bottom Bracket, such as the Bottom Bracket Drop, don’t affect the cockpit but rather the bicycle’s behaviour. I talked about this measurement in the post What is bicycle geometry?
The distance measured between the imaginary horizontal line connecting the wheel axles and the centre of the bottom bracket. The vertical value between these two points is the BB Drop (bottom bracket drop).
The standover (frame height from the ground) and the front-centre (distance from the centre of the bottom bracket to the centre of the front axle) are secondary measurements for the cockpit. These will be determined by others linked to the bicycle’s behaviour. We’ll park them for later.
A lot of data and heavy going, right? Let’s get into it.
Frame height
Frame height is decisive for the rider, since it dictates the maximum height for the handlebars and the saddle.
In the past, bicycles had a top tube completely horizontal to the ground. Frame height was determined by the length of the seat tube. With the arrival of new geometries and new measurements like Stack and Reach, frames began to be built more compactly. The introduction of these two measurements, in particular the Stack for determining height, has made it possible to achieve more precise measurements.
The Stack lets us quickly determine whether a frame is tall enough — or short enough — for the rider’s needs.

If you look closely, Stack isn’t determined by the total height including the stem and the spacers. This lets you vary the height of your position on the bike somewhat by adding or removing spacers between the stem and the head tube. It’s advisable not to stack more than 30 mm of spacers to avoid flex in the fork’s steerer tube. In Stack, the reference point is the centre of the bottom bracket, so that different fork lengths or tyre dimensions don’t interfere with the measurement.
Frame length
Before Stack and Reach came along, the effective top tube length determined frame length. Nowadays, this tube has a slight tilt in the horizontal plane known as sloping. When the top tube length is referenced in modern geometries, both measurements are given: the actual centre-to-centre length and the effective length.
The centre-to-centre length is measured along the actual sloping tube. The effective length is its projection parallel to the ground, which is greater than the sloping one.

This effective top tube length gives us an idea of the total frame length, though this measurement is influenced by the seat tube angle. As the seat tube angle increases, so does the effective length, and vice versa. This is where Reach comes in, giving us the horizontal measurement from the centre of the bottom bracket to the centre of the head tube. When the seat tube angle changes, the centre of the bottom bracket stays in the same position, so it doesn’t affect Reach.
When adjusting frame length by changing the stem, we have to pay close attention to its length, since stems are limited to 10 mm increments unless you opt for a custom-built stem. If you’re after a millimetre-precise fit, it’s important to study the frame geometry carefully. Or alternatively, opt for a custom bicycle to achieve that crucial adjustment to the length.
I’ll say it again, and I’ll keep saying it: when we think about changing the stem length to alter the overall length, we have to consider how the stem influences the bike’s handling. A longer stem will make the steering slower, and the opposite is also true.
Saddle setback
Saddle setback or forward shift has no bearing on Reach, but a good adjustment is hugely important to get the most out of the rider’s performance. Fortunately, most seatposts and saddles can be set up to the millimetre, even at scales of <1 mm to fine-tune the position.
But of course, everything has its limit, and saddle rails have a fixed length; in some cases that might not be enough to dial in the position. When this happens, we can turn to straight seatposts or ones with setback. Normal setback is between 2 and 2.5 cm. When you change the seatpost setback, the attack angle over the bottom bracket also changes, and this alters pedalling efficiency.
In the UCI regulations, point 1.3.013 states that “the tip of the saddle must be positioned at least 5 cm behind the vertical line passing through the bottom bracket. This distance does not apply to the bicycle of a rider competing in a track speed event (200 metres, flying lap, sprint, team sprint, keirin, 500 metres and kilometre); however, the tip of the saddle must not extend beyond the vertical line passing through the bottom bracket. The tip of the saddle may be moved forward as far as the vertical line passing through the bottom bracket, to the extent necessary for morphological reasons. Morphological reasons are understood as anything relating to the size or length of the rider’s limbs”.

In many conventional bicycle setups, this measurement is set as the reference point for achieving the rider’s correct position.
Here I’m including three GIFs. In them you’ll see how, by varying the type of seatpost — either with 21 mm setback or completely straight — the saddle’s forward position changes even when all other measurements stay the same. You can see the same thing happen with different seat tube angles. The only thing that changes is the vertical distance from the centre of the saddle to the centre of the bottom bracket; this happens because the saddle isn’t completely flat, so we shouldn’t take this measurement into account.
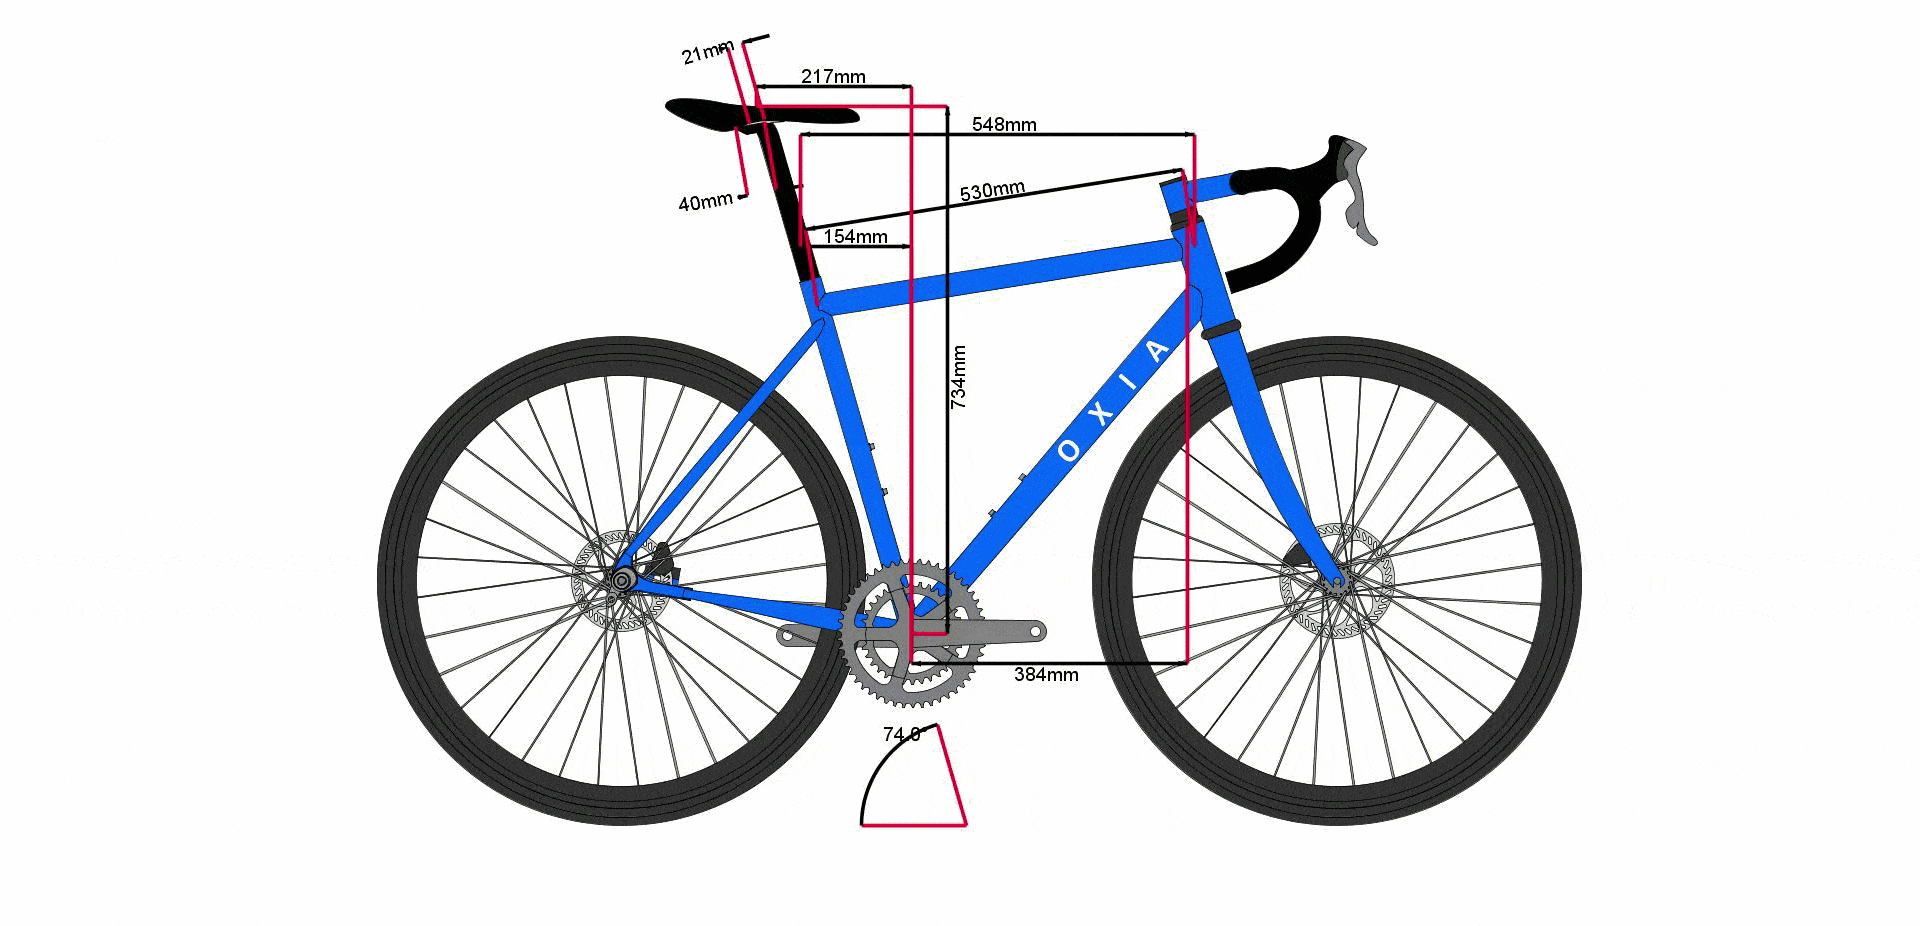
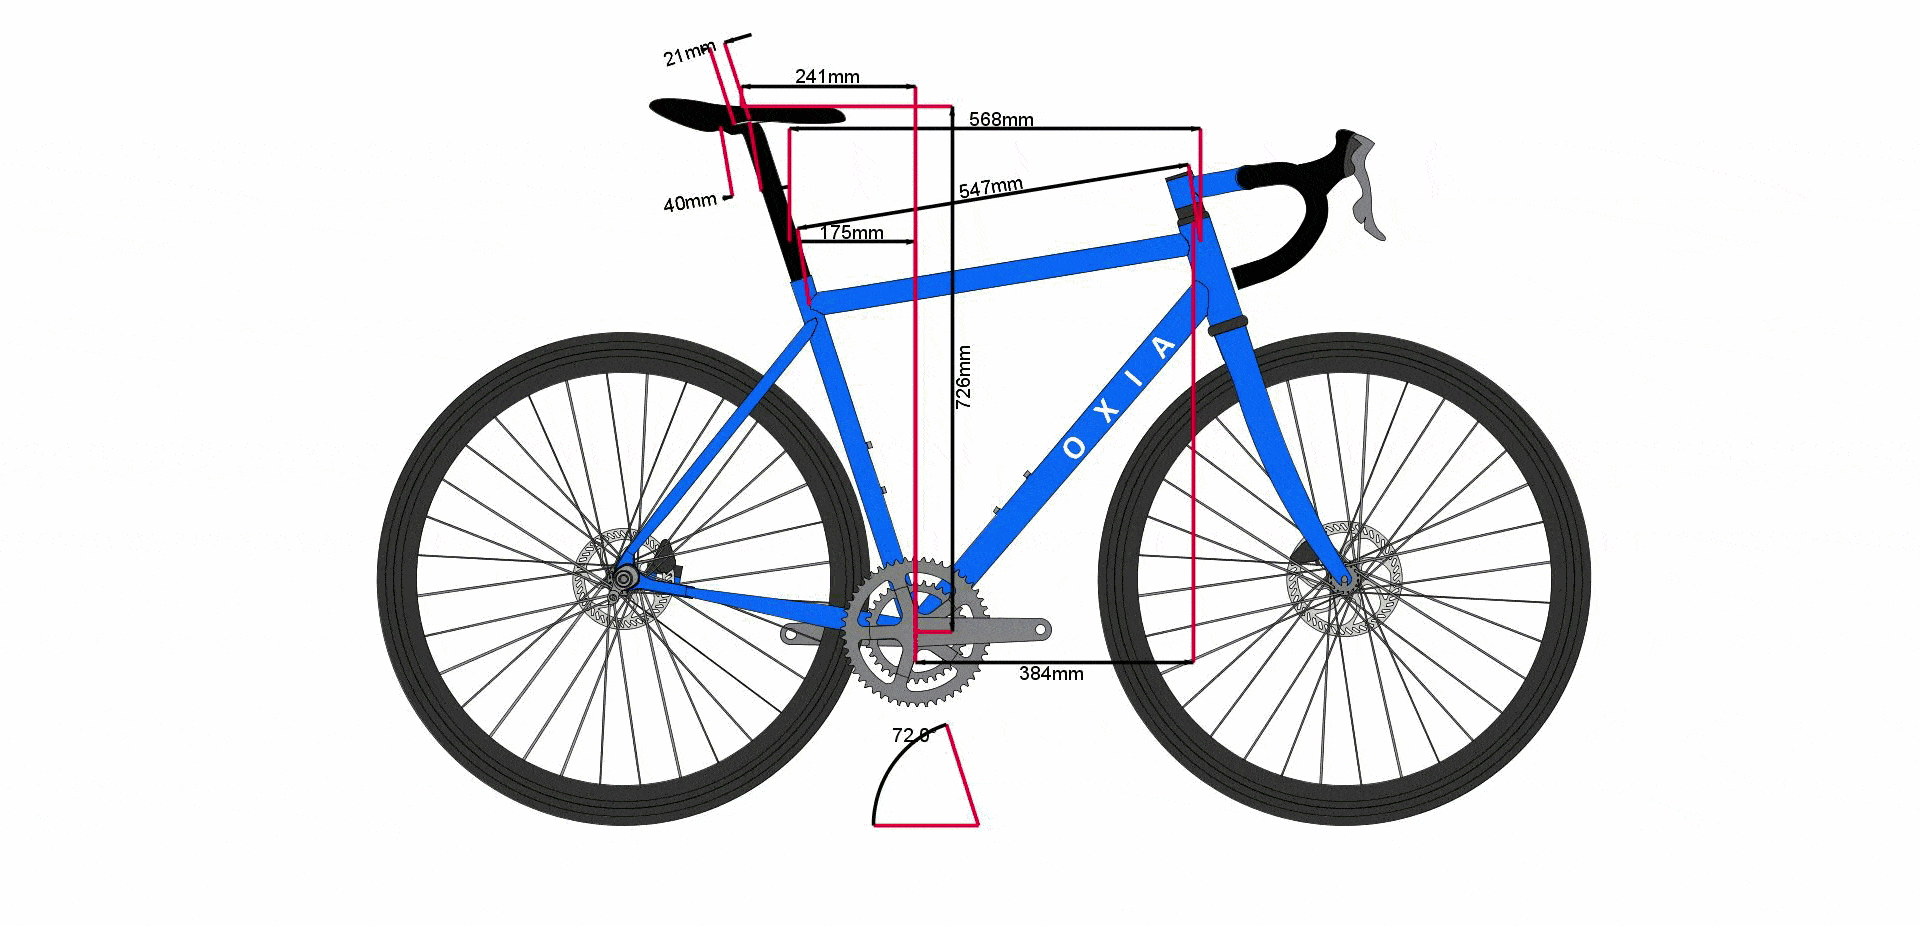

In the GIF below, you can see that when the seatpost setback changes, in order to keep the saddle’s forward position (217 mm) we have to change the seat tube angle from 74° to 72°. This entails changing other measurements, such as the top tube length. (In reality, dimensional adjustment is even more precise than this — this is just an example to illustrate how the measurements interact.)

Standover and Front-Centre
Standover tells us the height from the centre of the top tube to the ground. This measurement used to be used to determine whether the top tube sat at the height of the rider’s inside leg. In reality, it’s not a measurement used much these days, since the slope of the top tube means that, most of the time, swinging your leg over the top tube is comfortable.
On bicycles that need a longer head tube, Standover will be affected. For example, on a bicycle of the same size but with a longer head tube, the Standover will sit higher off the ground. This is worth bearing in mind, and considerable care is needed when comparing geometries and bicycles across different disciplines.
A bicycle with a Standover that’s too high for our needs is, therefore, a bicycle that’s too large for us. This restricts our movement and freedom when taking corners or pedalling out of the saddle, since the knees can end up striking the top tube.
In this example, as I mentioned earlier, you can see that the same size with a different head tube length (145 mm vs 165 mm) changes the Standover (776 mm vs 785 mm), but the top tube length also changes. That’s logical, since the head tube sits at an angle — with a touch of adjustment, it’s all sorted.

With Front-Centre we measure the distance from the centre of the bottom bracket to the centre of the front wheel. You may be wondering why this measurement matters.
Front-Centre depends on Reach, as well as on the head angle and the fork’s Rake. Within this space, the front wheel’s radius (tyre included) must fit, along with the crank length and the part of the rider’s foot that extends beyond the pedal axle.
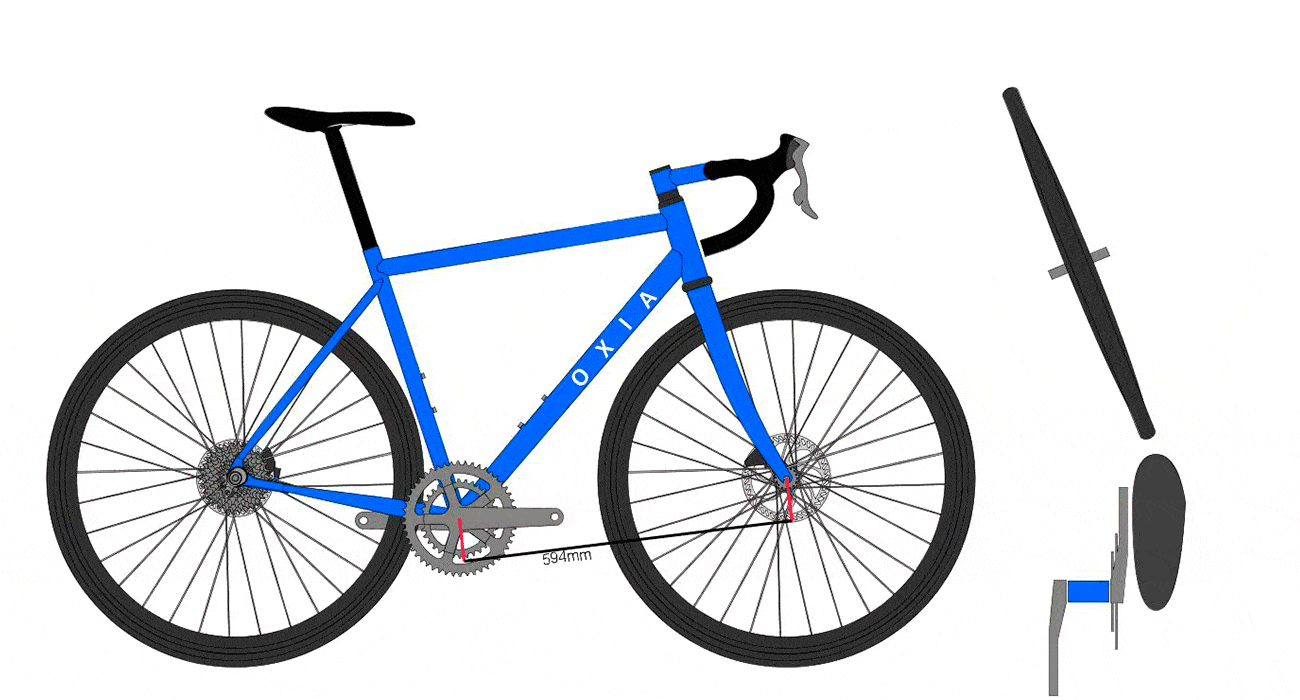
As you can see in the animation, if the design isn’t well resolved, the front wheel can clip the foot when turning, with the consequent risk of a crash. From size M (17″ in MTB or 54 in road) and L (19″ in MTB or 56 in road) upwards, this measurement doesn’t usually pose a problem, but in small sizes (16″ in MTB or 52-51 in road) or very small ones (15″-15.5″ in MTB or <50 in road) it does become a problem when trying to achieve a good geometry tailored to the rider.
When the large brands build small bicycle sizes, they have no trouble because they alter the Reach measurements and the head angle. They do so without considering the rider’s individual biomechanics, just to make sure this doesn’t happen. But when a custom bicycle framebuilder has to build a small frame, there are many variables to weigh up in order to preserve functionality and respect the rider’s biomechanics. It’s painstaking, complex work in which every detail must be studied, however small it may seem.
The difference between the right bicycle size and the wrong one
At the start of this post I mentioned that, in the late 1990s, a new geometry standard began to be introduced on bicycles (compact and sloping frames) so catalogues could be adapted to a wider range of riders. With the huge variety of seatposts and stems available, we can fit a bicycle to almost any rider.
However, buyers have come to understand that achieving the right bicycle size and a perfect fit is essential for the performance and comfort they couldn’t reach on an off-the-shelf bicycle. This has put custom bicycles firmly on the radar of many demanding riders.
Let me give you two examples: the first will be a large bicycle adapted to a short rider, and the second, the opposite — a small bicycle adapted to a tall rider.
Here you’d need to slide the saddle forward, lower its height, fit a shorter stem and even reduce the stem’s height above the Head Tube by removing spacers.


Here, on the contrary, we’ll have to slide the saddle as far back as possible and use a very long seatpost to accommodate the rider’s inside leg. Add spacers beneath the stem and fit a long stem with a positive angle to raise and stretch out the position.
If you look closely, you’ll see that the height added by the spacers beneath the stem is excessive, putting the steerer tube at risk of flex. In fact, fork makers often have specifications for the maximum and minimum number of spacers that can be safely fitted.
Either of these two modifications compromises the bicycle’s structural integrity. In the first example, the bicycle becomes hard to handle — in short, a sluggish bicycle. In the second example, it’d be the complete opposite: we’d end up with a very twitchy bicycle with excessive reactivity — to exaggerate, it’d be like riding a mechanical bull.
Conclusions
When we drive or walk through the countryside, we see bicycles constantly — on weekends we can count dozens, even hundreds. It’s easy to sort riders into categories or groups by their clothing, the type of bicycle or their attitude on it. Yet if we stop to observe their position on the bike, their flexibility, their height and other bodily proportions, what unfolds before our eyes is a spectrum of categories that defies any single geometry.
Today’s frames, with their compact geometries and sloping top tubes, are an efficient solution for all the categories mentioned. But for many experienced riders with a deep understanding of bicycle geometry — and also for those without that knowledge who expect something more from their bike than simply the chance to head out and turn the pedals with friends — standardised bicycles won’t satisfy their cycling desires. These designs cannot match the precision of a custom frame, a hand-built frame created from scratch around the rider’s anthropometric qualities and abilities.
No marketing strategy will change these riders’ minds. Having a wide range of models, geometry options and configurations is very good for the general public. But realistically, choosing a hand-built custom bicycle is something deeply valuable. It delivers the perfect fit and the perfect enjoyment on the bike.